Pretty is my Profession
  • Home
  • Favorites
  • Makeup
  • Skincare
  • Hair
  • Body & Fragrance
  • Tools
  • Clean Beauty
  • Wellness
  • Contact Us


Review: HollyBeth Organics Rose and Geranium Face Moisturizer 

Winter has taken quite a toll on my skin this year and as I've gotten older, my dry skin has become drier and drier. Luckily, I was introduced to this hydrating and naturally derived moisturizer! This HollyBeth Organics Rose and Geranium Face Moisturizer was sent to me for testing purposes but all opinions are my own. I hadn't heard of this line before but I'm always looking for more natural alternatives to my current skin care products. They are all natural and are cruelty-free! 

The HollyBeth Organics Rose and Geranium Face Moisturizer retails for $45.00 USD for 2oz. of product and is available at hollybethorganics.com, Amazon, and other retailers. This natural moisturizer is packaged in a simple glass jar that feels sturdy and ergonomic. 


The product is a yellow balm that feels quite solid in the jar but will melt into an oil on the skin. Its best to scoop a bit out into the palm of your hands and rub them together to melt the product. Then apply it all over your skin. It will feel like a face oil, which I love! My skin is dry and I am constantly going through my face oils. This product is incredibly hydrating! In the morning, my skin is glowing and hydrated! The scent is a very beautiful and true rose scent. I even apply it over my lips when I apply it all over my face. Its a great evening moisturizer and all over hydrating balm. I use it wherever I need hydration. 

You can see how pure the ingredients are in this product:

Camellia Oleifera (Camellia) Seed Oil*, Prunus Amygdalus Dulcis Oil (sweet almond oil), * Simmondsia Chinensis (Jojoba) Seed Oil*, Rosa Mosqueta (Rosehip) Fruit Oil*, Beeswax*, Rhamnoides (Sea Buckthorn) Fruit Oil*, Tocopherol (vitamin E), Pelargonium Graveolens Oil (rose geranium oil)*. * organic

This is probably the shortest list of ingredients in a moisturizer you will ever see! Its just pure and natural oils without any preservatives or extra filler chemicals, Also, it comes with SO MUCH product! A little scoop of this product will cover my face and neck. I can't see myself going through this any time soon. 

Overall, I love this hydrating moisturizer! I love the natural ingredients and the glowing results. I have been using it for the past three months, if not more, and it is the best winter moisturizer for my skin. I haven't reached for my face oils this winter because this product is so potent. The product is also so versatile and can be used all over the body and on your lips!


Review: IGK Beach Club Texturizing Spray


I was sent this product from Influenster and IGK Hair for testing purpose but all my opinions are my own. If you haven't signed up for Influenster yet, you should! Its a free program for anyone to join and receive products to review! Anyone can do it, you don't need a big following or a blog but the more you have the better! You just register and connect your social media accounts, answer some "snaps" (questions), and post review on their app. The more you do, the more likely you will be sent a box every month! Click the link here to sign up:

www.influenster.com/r/1500687

IGK is a brand I had never heard of until I was sent these products. Here is a little info about them.

About IGK Hair (off Sephora's website):

This line of luxury hairstyling products comes from IGK, a brand founded by in-demand stylists from New York City, Los Angeles, and Miami. Inspired by the of-the-moment trends happening in their culture capital cities, IGK offers hair care for the modern generation.
The IGK Beach Club Texturizing Spray retails for $29.00 USD for 5oz of product and is available at Sephora. The product is packaged in a aerosol metal spray container with a typical spray nozzle, like on a hair spray container. The packaging is very aesthetically pleasing and photogenic. Clearly made for today's digital age of image sharing and Instagram. I really feel the packaging reflects the brands aesthetic and style. It is very cool, casual, and trendy. 

This coconut gel is described on Sephora's website as: 
What it is:
A breakthrough aerosol texture spray that delivers a salty, windswept look in seconds without heaviness, stickiness, or drying. 

What it is formulated to do:
Want that surf-and-sand kind of hair? This versatile texture spray can be used on wet or dry hair for your specific needs. Formulated to add volume and texture to hair to create a sexy, wind-blown look, it also adds fullness, hold, and a cool, matte finish. Glycerin helps to lock in moisture, preventing hair from drying out, while hydrolyzed wheat protein adds natural body to the hair. 
Like I have said in my previous reviews of the Conditioning Oil (review here.) and the Coconut Oil Gel (review here.), I am THE LAZIEST person when it comes to hair so I want the shortest route possible to extraordinary hair. Second to dry shampoo, texturizing spray is my other life source! I have fine and flat hair without product its pretty boring. Texturizing spray is probably the product is the easiest way for me to "style" my hair and get out the door. I'll look at least polished and like I've put in some kind of effort. 

The instructions direct you to apply this product to damp or dry hair, starting from the roots to the ends. This pressurized can distributes the the product in a nice fine spray. It is very easy to control the amount of product being applied through the nozzle. You can spray it in short bursts or hold down for more product. The texturizer is a dry texturizer and feels weightless in your hair. It doesn't feel sticky or like there is lots of product/residue stuck in your hair. I have had this happen with other texturizing sprays and it makes it feel like your hair is dirty. This one is so light and fine. It holds and creates texture in your hair. It gives volume and that "windswept" look to your hair. It gives a little wave to your hair and works very with the other products from the line. If you want a really effortless and sexy beachy look than this product is for you! With my fine hair, its so difficult to get it to do anything but with this product its so easy to style my hair! I like using this product after using my curling wand to hold in my wave without the stickiness of hairspray. Plus the SCENT is aaaaammmmaaaaziiinng!!! The scent is coconut heavy and smells like a tropical vacation! 

Overall, I love this texturizing spray! It reminds me of the Oscar Blandi dry texture spray but with a much better scent. I love the volume and texture it gives to my hair. I also love that its light-weight and doesn't leave residue in my hair. I will be purchasing the product after I use up this bottle.


Shop IGK Haircare and Styling Products: 


Review: IGK Rich Kid Coconut Oil Gel 

I was sent this product from Influenster and IGK Hair for testing purposes but all my opinions are my own. If you haven't signed up for Influenster yet, you should! Its a free program for anyone to join and receive products to review! Anyone can do it, you don't need a big following or a blog but the more you have the better! You just register and connect your social media accounts, answer some "snaps" (questions), and post reviews on their app. The more you do, the more likely you will be sent a box every month! Click the link here to sign up:

www.influenster.com/r/1500687

IGK is a brand I had never heard of until I was sent these products. Here is a little info about them.

About IGK Hair (off Sephora's website):

This line of luxury hairstyling products comes from IGK, a brand founded by in-demand stylists from New York City, Los Angeles, and Miami. Inspired by the of-the-moment trends happening in their culture capital cities, IGK offers hair care for the modern generation.
The IGK Rich Kid Coconut Oil Gel retails for $27.00 USD for 5oz of product and is available at Sephora. The product is packaged in a plastic squeeze tube container, it makes it easy to control the amount of product being released. The packaging is very aesthetically pleasing and photogenic. Clearly made for today's digital age of image sharing and Instagram. I really feel the packaging reflects the brands aesthetic and style. It is very cool, casual, and trendy. 

This coconut gel is described on Sephora's website as: 
What it is:
A coconut oil-infused gel to create hydrated, undone hair. 

What it is formulated to do:
Inspired by the international jet set kids, Rich Kid's moisturizing properties give you the hair you've always wanted. Reap the nourishing benefits of coconut oil in a weightless formula that moisturizes and conditions, leaving hair with a natural luster and softness. Ideal for fine to normal hair, it replenishes lost nutrients that could cause hair to be weak, dry, or damaged. 
The instructions direct you to apply this product to towel-died hair and for optimal separation and hydration, you should allow your hair to air-dry. Like I said in my review of the Conditioning Oil (review here.). I am a lazy person when it comes to hair. So I love products that make me look like I put in a lot effort into my hair, when I actually just slept instead. If you also love your sleep, then your going to love this product. 

Initially I was very confused about the function of this product. Is it a oil in gel form? Is is a hair gel? What is this mysterious product? Well, like Sephora's website states, its a hydrating styling gel that creates an effortless undone effect. You know the "model off-duty hair". Its a little messy, undone, beachy and its the latest hair trend on and off the runway. The scent is the same as the Conditioning Oil, it is reminiscent of a very fresh unisex fragrance but it doesn't linger at all in your hair.  

After towel drying your hair thoroughly, make sure it is only damp, squeeze a nickle size amount into your palms and scrunch it through your hair. The product is a bit sticky like a gel but it is also very creamy, capable of smoothing out flyaways. I will add more as I feel I need it but because of the creamy nature of this coconut gel, it doesn't make your hair crunchy or sticky. It gave my pretty much straight hair some texture and wave to it. To enhance the beachy/wavy effect, I like to tie my hair up in a messy bun and let it dry that way. Before I go to bed, I just take my hair out of the bun, fully dry or not, and sleep. The next morning my hair is effortlessly, LITERALLY, wavy and gorgeous! In the morning, my hair is fully dried but isn't sticky or crunchy, like the effect from traditional gels. My hair is still soft and maintains a natural look but with more texture.

 I love products like this, that style while you sleep! Isn't that a dream? I used to use a gel-creme product that was kind of similar from L'Oreal but it has long since been discontinued. Since then, I hadn't found a product quite like it but now I have a new favorite! I don't feel the need to use my curling wand because my hair already looks so good! Occasionally to get more curl, I will use my curling wand on random sections of hair and the gel helps it holds its shape. 

Another way I like to style my damp hair is scrunching this product throughout my hair and twisting and pinning it up. Create twists with chunks of hair; use larger sections of hair if you have fine hair, like mine, or use smaller sections for thicker hair. In the morning let all your twists out and you have beautifully wavy hair! You can also get more curl to your hair if you do tighter twists or smaller sections. 

This product also works very well on dry hair. Using a little at a time, you can use it to smooth flyaways or tame baby hairs. I have a halo of flyaways and it drives me crazy but using things like traditional gel or hairspray can cause your hair to feel sticky, crunchy, or heavy. This feels light and is pretty much undetectable if used with moderation. You can also use this to create texture in dry hair. I like to scrunch some into the ends of my hair for a super piece-y/separated look to either straight, wavy, or curly hair. It really helps define the layers in my straight hair, making my hair appear styled when I didn't really do anything. 

Curly haired beauties, I haven't forgotten about you! This product would be perfect for defining your already beautiful curls and smoothing any frizz you have without compromising your soft bouncy locks!

Overall, I love being able to style while I sleep! I love the piece-y/separated, wavy, beachy look it gives my hair with just this single product. Its what I strive for on a daily basis but with very minimal effort. This product is so versatile and you need so little to style your hair. When I run out of this product I will definitely be purchasing another tube but I don't see myself finishing this product for a long time, even with daily use! Its such an easy and effective product to get my hair looking chic while hydrating it!  

Lazy friends unite! Let me know about your lazy hair routine. What are your favorite products for styling while you sleep?

Shop IGK Haircare and Styling Products: 


Review: IGK Smoke and Mirrors Conditioning Oil 

I was sent this product from Influenster and IGK Hair for testing purposes but all my opinions are my own. If you haven't signed up for Influenster yet, you should! Its a free program for anyone to join and receive products to review! Anyone can do it, you don't need a big following or a blog but the more you have the better! You just register and connect your social media accounts, answer some "snaps" (questions), and post reviews on their app. The more you do, the more likely you will be sent a box every month! Click the link here to sign up:

www.influenster.com/r/1500687

IGK is a brand I had never heard of until I was sent these products. Here is a little info about them.

About IGK Hair (off Sephora's website):

This line of luxury hairstyling products comes from IGK, a brand founded by in-demand stylists from New York City, Los Angeles, and Miami. Inspired by the of-the-moment trends happening in their culture capital cities, IGK offers hair care for the modern generation.
The IGK Smoke and Mirrors Conditioning Oil retails for $29.00 USD for 5oz of product and is available at Sephora. The product is packaged in a metal aerosol container with a pressurized pump that dispenses product. The packaging is very aesthetically pleasing and photogenic. Clearly made for today's digital age of image sharing and Instagram. I really feel the packaging reflects the brands aesthetic and style. It is very cool, casual, and trendy. 

This conditioning oil is described on Sephora's website as: 


What it is:
A gentle, effective cleanser that sweeps away impurities while nourishing your scalp with a dream cocktail of coconut oil and powerful hydrators. 

What it is formulated to do:
This innovative formula gently cleanses hair by removing product buildup and neutralizing odors. Its blend of natural oils and vitamins adds intense moisture and keeps hair feeling soft and supple while imparting exceptional shine. Perfect for anyone looking for their healthiest lengths ever—especially those with color-treated hair, dry scalps, or unruly curls—it takes the place of your regular shampoo and conditioner. Coconut oil nourishes and strengthens hair, while sweet almond oil, one of the best oils for hair, helps damaged and dull hair become shinier and stronger. 

The instructions direct you to use a dime-size amount of the product but I have to disagree. My hair is on the long size and I used at least a quarter size, if not a bit more. The product is white and has the consistency of conditioner. The product sprays out of the pressurized can through the pump. The pump to was a bit strange to use at first, you need to kind of pull back, instead of push down. I was skeptical at first because I haven't had great experiences with 2-in-1 products. A cleansing conditioner sounded like a product that would not work well for either functions. Luckily, it was able to restore my faith in 2-in-1 products! 

So I'm a lazy person...and when it comes to hair, I'm even lazier. I'm always looking for the most effective products that require as minimal effort as possible. The product lives up to all its claims and really impressed me! I thought that with my dry color-treated hair, there would be no way this product could be the only conditioning element in my washing routine but it really worked! My scalp felt surprisingly clean but not stripped. My hair felt very silky and smooth! Like I said earlier, I use about a quarter size amount and massage it into my scalp, like a shampoo. It will not bubble or create any suds, it feel just like conditioner. Then I run the rest down my hair to the ends, making sure I coat all of my hair. It will feel like there isn't enough product but it will all work out in the end. You can apply a little extra to the ends of your hair, if you feel like it needs a little more love. I like to leave the product on for a minute or two, then I rinse. As you rinse it, you will feel how smooth and silky your hair is! Your hair will look shinier and it feels clean! Even after towel drying, I don't feel the need to apply a leave-in conditioner or any other conditioning product. My hair brushes through really easily. The scent is a bit strong, if you are sensitive to fragrances you may want to check it out in stores. The scent reminds me of a really fresh men's cologne. Its not overly masculine but more of a unisex scent, like a Tom Ford fragrance. It's also not a scent that lingers, I didn't smell it after my hair was dry.  

Overall, it is a bit of a pricey product but it does eliminate the need to buy two products! In that way, you could say its saving you money. Especially if you enjoy buying luxury or high-end shampoos and conditioners. It is so effective! I honestly, will be running out to buy a bottle when this one runs out! Its such a shower time saver and makes my hair look so good without any effort. I love the way it makes my hair feel and the results are instant, after one use! 


Do you have any lazy girl/guy products? What are they? I would love to know! Leave a comment down below or find me on Instagram!

Shop IGK Haircare and Styling Products: 


Tom Ford Winter Soleil Masterclass

A few weeks ago, I was lucky enough to attend a Tom Ford Masterclass hosted at my local Neiman Marcus. This was the first time my local Tom Ford counter has done a makeup related event and I was so excited to see what it was all about. I was able to reserve a spot for the class by purchasing a $50 gift card at my local counter.

My boyfriend asked me why I wanted to go to a makeup class when already knew how to apply makeup. My response was, it wasn't about learning to apply makeup but about learning the intended way to apply the products. Every line manufactures their makeup with the intention that it will be applied a particular way. Although I have my own way of applying makeup, it very interesting to see how the brand wants you to use the makeup. 

The event was in an intimate and small space with small round tables set with one of Tom Ford's new Private Blend candles and a face chart, The event served us champagne and little bites throughout the session. Let me say, they were generous with the champagne and I was able to have several glasses. As with all Tom Ford events the aesthetic was very luxurious and classy. 


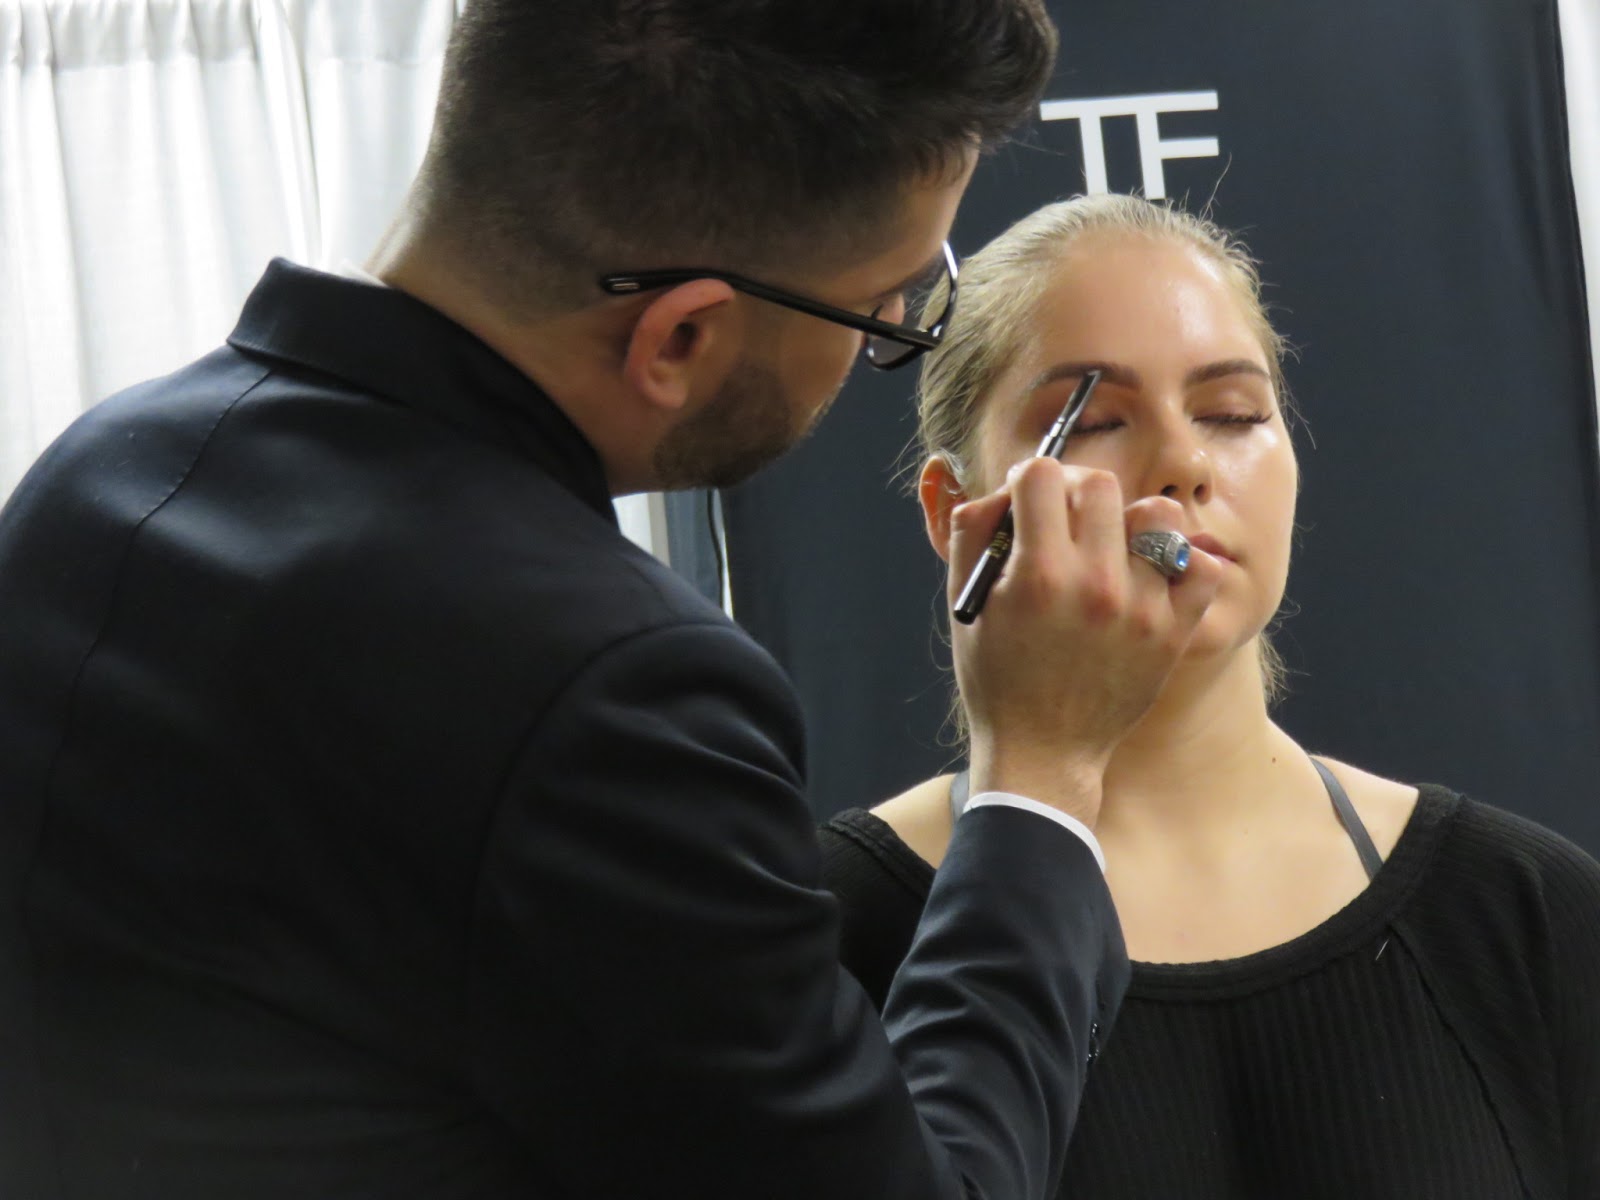
For this Masterclass, they brought in National Artistry Executive,  Allan Aponte to show us techniques and give us tips on makeup application. This Masterclass was focused on their recent collection, Winter Soleil. This collection included two face palettes in warm and cool (reviewed here and here) and five shades of metallic lipsticks. The collection, as well as some of the permanent line items were beautifully displayed in the front of the room. Allan used one of the attendees as a model and because the room was small all the attendees were able to get a good luck at his techniques.

We started out by going around the room and sharing our favorite Tom Ford product. I ended up going first and of course I couldn't possible choose one favorite... but I went with Moodlight Illuminating Duo. It was really interesting to hear everyone share their favorites. Many people said foundation, lipsticks, primer... etc. Then we proceeded to the makeup application. 


Allan explained that there are 10 steps to the Tom Ford method of makeup application. 

1. Prepping the skin: Allan began by prepping the skin with the Radiant Moisture Souffle, one of my hero skincare products (full review here.), mixed with the Intensive Fusion Face Oil. He messages the mixture into her skin until it glows. The Moisture Souffle contains European basil oil that helps hydrate the skin without leaving a residue. Then he went on and applied a pump of  the Intensive Infusion Eye Treatment with a light tapping motion around her eyes. When Tom Ford created this product he wanted it to be in a packaging that wouldn't require his customers to dip their fingers into the product to keep the product sanitary. This explains the beautiful pump packaging of this eye cream. Also, all the "Infusion" products contain caffeine infused with other nourishing ingredients to hydrate and lift the skin.  At this point, the model's skin was very radiant and hydrated, ready for the makeup application.


2. Foundation: As a architect, Tom Ford looks at beauty in the same way he looks at architecture. That is, foundation is the most important part of a makeup because it is the foundation for everything else to sit on.  He believes in applying everything with a brush, in order to achieve a truly flawless and soft finish to the skin. So Allan applies a pump of the Illuminating Primer, with the Foundation Brush , a classic flat paddle shaped foundation brush. 

Then, using the Cream Foundation Brush and a squeeze of the Waterproof Foundation and Concealer, he works the product into his brush from his hand. He then begins applying the foundation is short wispy motions. Allan's tip for foundation is applying a light layer all over to correct the skin, then going in with more foundation to spot conceal. The foundation is meant to be the line's first full coverage foundation. Allan's tip helps maintain a natural look and finish to skin, which suits in with the Tom Ford style. For those of you looking for something lighter, Allan recommends mixing the foundation with some moisturizer and he swears it will still last all day.


3. Concealer: Allan uses the Concealing Pen and the Shadow/Concealer Brush to go in under the eyes and conceal. He applies the concealer with the brush, then goes in with his finger and a light tapping motion to blend. Allan said he loved this concealer because the applicator is so soft, it is made with silk fibers. How luxe!


4. Shade and Illuminate: Not only is this a step but the product, as well! Back to Tom Ford's architectural view to beauty, this step is to begin to build the structure on top of the foundation. In other words, it brings back the shape and structure to your face because the foundation make your face one tone and removes any dimension or flaws from the skin. Using the Shade and Illuminate palette in Intensity 01 and the Shade and Illuminate Brush, Allan sculpts the models face. His technique is he creates three lines, one under the cheek bone, one at the temples, and one on the jawline. The Shade and Illuminate Brush helps him create sharp and precise lines because the brush is a flat and firm, allowing the user to be able to feel the bone structure in their face by pressing down while applying product. Switching back to the Cream Foundation Brush, Allan blends the lines of product into skin for a seamless contour. 

Which shade? I think the most interesting thing I learned at this Masterclass was how to choose your Shade and Illuminate shade. The difference between Intensity 01 and 02 is not that one is deeper than the other but that 01 is for yellow or warm skin tones and 02 is for pink/cool skin tones. Now that I know this, I can see the difference in the tones of the product. 01 does have yellow tones whereas, 02 had a lot red tones in it. I love that Mr. Ford created these based off of skin tones and not skin color. 


5. Eyebrows: Both Tom Ford and Allan believe that starting with the brows first before eye makeup is the best way to create a cohesive look. Allan says that the best way to create boundaries for your eye makeup is to fill in your brows. It prevents you from applying too much eye makeup and blending it out too far. Also, Allan says its the best way to lift your face without surgery! So starting with the Brow Sculptor , Allan brushes the eyebrows up and back. He begins shaping the brow from the front and then outlining the top of the brows. This is one of the most important things he did. Creating clean and crisp strokes on the top of the brow will ensure you have a good structure and shape you your brows. He then uses the Brow Sculpting Kit to softly fill in any sparse areas and finally, finishing the brows with the Fiber Brow Gel.  The magical thing about this fiber brow get is that you can't see the fibers, they just make your brows look fuller. 


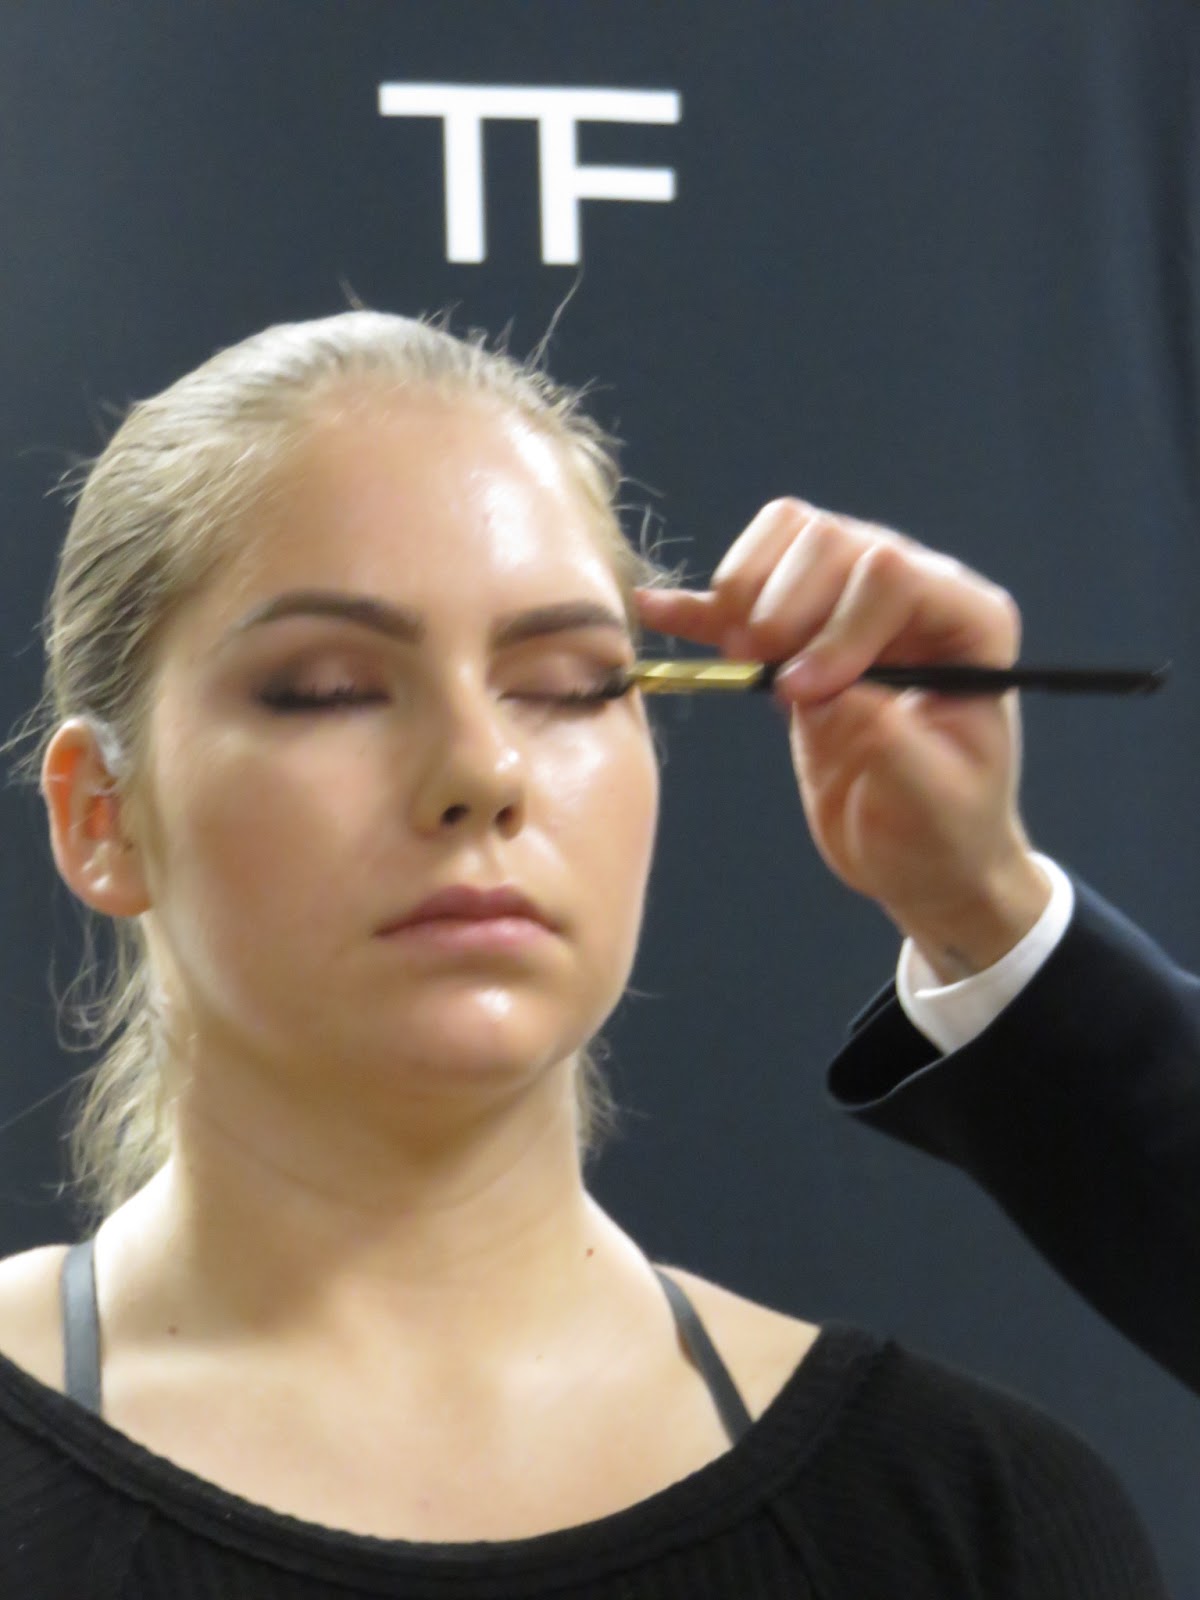
6. Eyes: Starting with Eye Primer Duo, Allan used the Shadow/Concealer Brush to apply a thin layer of the cream primer all over the lids and then a thin layer of the finely milled pressed powder on top to set it. The primer minimizes lines on the lids, neutralizes discoloration, and primes the lids for color. 

Allan then pulled out the beautiful Winter Soleil Warm Palette (full review here.). This palette contains four jet-milled eyeshadows, meaning the particles of powder are milled until they are 100 times smaller than a hair! Now we know how they get their shadows to be so pigmented, blendable, and how they minimize any fallout!


  • Starting with the Rose Bronze shade and the Eye Shadow Brush, Allan brushes the shade across the whole lid  and using the tip of the brush, places some shadow underneath. 


  • Then going in with the Deep Brown shade and the Eye shadow Blend Brush , he feels for the socket bone with his brush and places color into the crease and just half way under the eyes. Allan always places some shadow under the eyes because he believes in "connecting all the lines", that is, making your look continuous and flawless around the eyes by having a continuous color placement.  


  • To highlight the inner corner of the eye, Allan uses the Light Gold shade and the Eye Shadow Contour Brush  to place it in the inner corners. 

  • Finally, to finish the look off, Allan uses the Bronze Glitter shade with his finger and patting it over the lid. He says this is the best way to apply the Sheer Sparkle shades and minimize fallout. 


Allan then defines the eyes by lining them with Eye Defining Pencil in Espresso. He lines the tightline, waterline, and the top of the lid. He blends the lower lashine with the Eyeliner and Definer Brush. 


7. Lips: Allan explains that doing your lips first, tells your cheeks what to do. So before applying any blush, he applies the Soleil Lip Foil in Aperture to the models lips. 


8. Blush: Allan uses the Coral Blush in the palette and the Cheek Brush to create a glowing and fresh look. He starts from the apples of the cheeks and pulls back to the cheek bones. Then he uses the Peach Champagne Highlighter in the palette and with the other side of his cheek brush, he applies it on top of the cheekbones. Now I had to emphasize "on top" here because Allan says people often apply highlighter in the wrong area. He applies the highlighter on top of the cheekbone, almost under the eyes because it won't take up space where blush should be. Also, he only takes the highlighter down to the middle of the eye.


9. Powder: This step is really optional because Allan uses such a minuscule amount of powder. He wants to keep the skin looking as natural as possible, He very lightly dusts some sheer powder from the Primer Duo under the eyes, around the nose and bit on the forehead with a small eye shadow brush. 

10. Mascara: Allan saves mascara for the very end. He says it keeps the lashes looking extra black and bold because there any powder or eye shadow dust will not stick to the mascara and make it dull. All those steps were already done and won't interfere with the intensity of your mascara. 
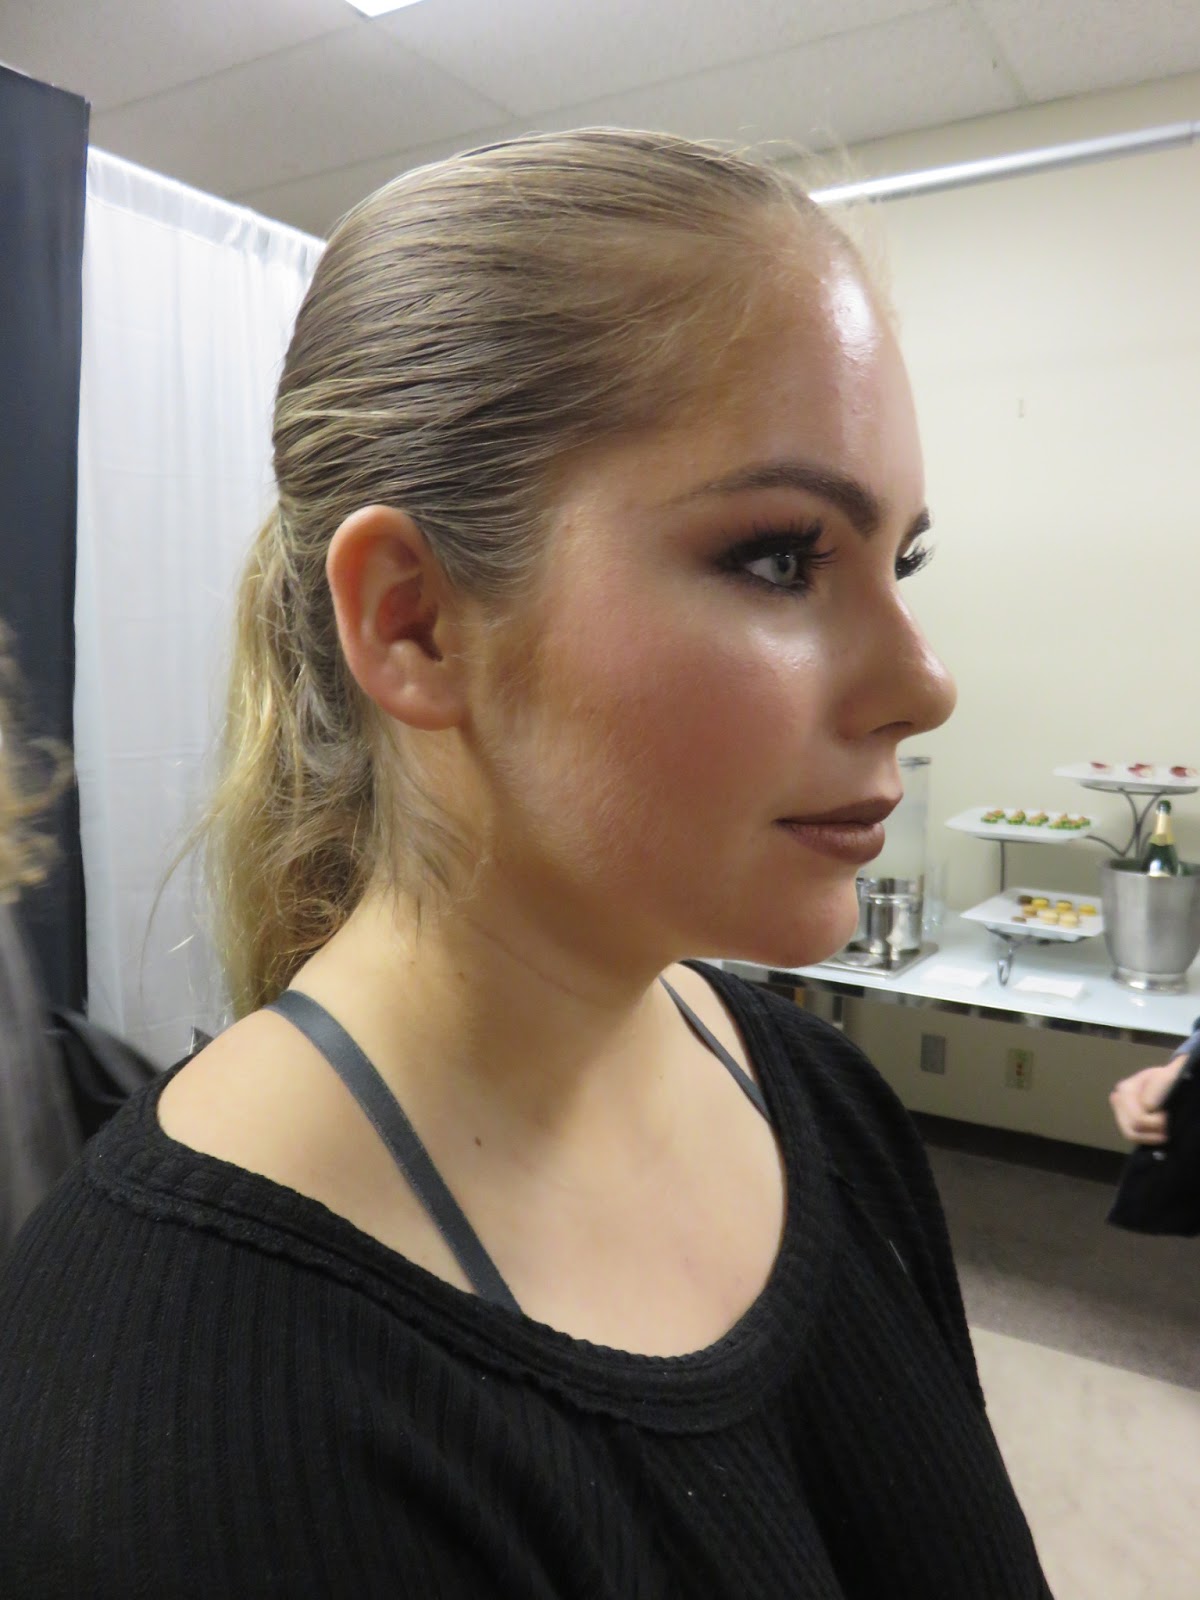
The Finished Look: 


The Tom Ford way of washing your brushes... 

This is probably the most luxurious way you can wash your brushes! Using the Neroli Portofino Bath Soap, you take your brush and use the strokes that you use when applying your makeup. For example, if you are using back and forth motions when applying your foundation, you would do the same on to the bar of soap. Allan says the makeup leaves the brush the same way it came into the brush, making this the most effective way of cleaning your brushes. This is a great tip regardless of what type of soap you use!

Overall, I learned a lot about the line and products. It was great to see "the look" that Tom Ford intended for the Winter Soleil Warm Palette. It was definitely inspiring to see Allan Aponte in action and I hope my Neiman Marcus will do an event like this again! I would highly recommend you all sign up for a class, if it is offered near you. You won't regret this fun and luxurious experience.  


Newer Posts Older Posts Home

ABOUT ME

Lover of all things pretty. Beauty obsessed makeup artist and former worker bee for the beauty industry.

SUBSCRIBE & FOLLOW

POPULAR POSTS

  • | Review | Bali Body Ceramide Cream
  • | Review | Bali Body Hydrating Body Serum
  • | Review | Makeup By Mario SoftSculpt Transforming Skin Enhancer
  • | Review | Chanel Les Beiges Water-Fresh Blush
  • | Review | Hourglass Ambient Lighting Edit - Sculpture
Wellness
Fashion
Fragrance & Body
Tools
Hair

Advertisement

SHOP MY FAVES

PRETTYISMYPROFESSION

  • About Me
  • Terms & Conditions

Outer Beauty attracts, but inner beauty captivates

Copyright © Pretty is my Profession. Designed by OddThemes